
To clean vinyl siding without scrubbing, wet the plants and the wall, apply a siding cleaner at low pressure from the bottom up, and let it dwell for 5 to 10 minutes without drying. Then rinse from the top down with the spray aimed down or across, never up under the laps. The cleaning solution kills the algae and lifts the dirt, so a brush is not necessary on most walls.
What you need to clean vinyl siding
Vinyl does not rot and does not need paint, and it takes a cleaning solution well. That is why most siding can be cleaned with chemistry and water, not a brush. For a one-story wall you need:
- A garden hose with a spray nozzle that has a fan or shower setting.
- A pump sprayer or a hose-end sprayer for the cleaner.
- A cleaner made for vinyl siding. For green algae and black mildew, the cleaner must say it kills them. For light dust only, a mix of 3 parts water to 1 part white vinegar works.
- Plastic sheet for delicate plants, and tape for outlets and light fixtures.
- Safety glasses and gloves. Siding cleaners that kill algae burn eyes.
A pressure washer is optional, and it is the tool that causes most of the damage described below. If you use one, use the widest fan tip and the soap nozzle, and stay well back from the wall.
For two-story walls, gable ends, or anything you would reach from a ladder, see the last section before you start.
How to clean vinyl siding, step by step
- Walk the house and find each material on each wall: vinyl, painted trim, stone accents, aluminum soffit, brick. Each one gets different treatment.
- Close and latch all windows, including storm windows and basement windows. Tape over outlets and light fixtures near the area.
- Soak the plants and the lawn at the foot of the wall. Wet leaves do not absorb the cleaner. Cover anything delicate and move pots and furniture away.
- Wet the siding. A wet wall dries more slowly and the cleaner spreads more evenly.
- Apply the cleaner from the bottom of the wall up. If you start at the top, the cleaner runs down over dry vinyl and leaves streaks that are hard to rinse out.
- Let it dwell for 5 to 10 minutes, or the time on the label. Do not let it dry. On a hot or sunny wall, work in smaller sections or wait for shade.
- Rinse from the top down, with the spray aimed down or across the laps. Rinse the groove under each lap, where residue collects.
- Rinse the plants and the lawn again.
- Look at the wall when it is dry. Wet vinyl hides streaks and missed spots.
Clean the north side first if you want to see the worst case. It holds the most algae because it gets the least sun.
Can you clean vinyl siding without scrubbing?
Yes. On most vinyl walls, a cleaner with the correct dwell time removes algae, mildew, and road film with no brush at all. This method is called soft washing. The cleaning solution does the work, and the water only rinses it off.
Scrubbing can cause harm. A stiff brush or scouring pad leaves fine scratches, and scratched vinyl holds dirt in the scratches and gets dirty faster. On older vinyl with oxidation (a chalky surface layer), spot scrubbing leaves bright patches with hard edges that do not match the rest of the wall.
Use a soft brush for one case only: a stain that did not move after two applications of cleaner, on sound vinyl that does not chalk. Even then, brush the full width of the panel so the result is even.
Our guide to soft washing stucco, EIFS, and vinyl siding explains why this method works on vinyl and on other surfaces that pressure damages.
On vinyl, as on every wall we clean, the most algae is always on the north side and on walls under large trees. We soak the plants at the foot of the wall before the cleaner goes on, and we rinse them again after.
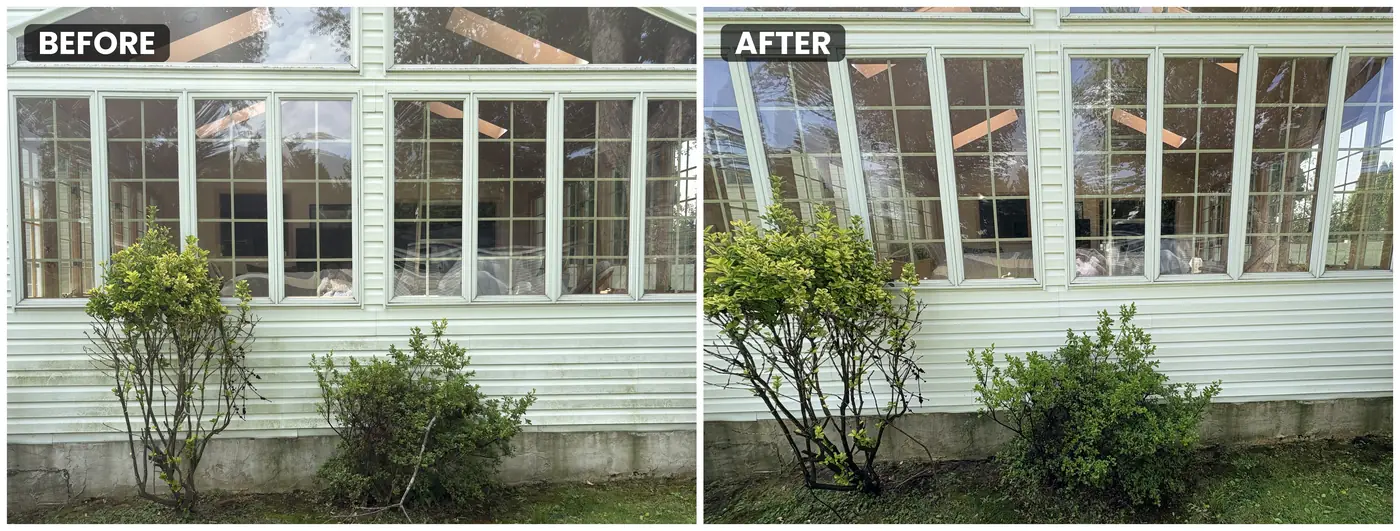
Can you pressure wash vinyl siding?
You can, but most vinyl damage comes from it. The panel can take the water. The wall behind the panel cannot.
Vinyl siding is a rain screen. It sheds water that runs down its face, and it lets the wall behind it dry. It is not made to stop water that comes from below at pressure. Aim a wand up under a lap and the water goes into the wall cavity, onto the housewrap, and against the wood sheathing. Nothing shows on the day. It shows months later as a stain inside, a soft spot, or a smell.
High pressure close to the wall also cracks panels outright, mainly older panels that the sun has made brittle. If you use a pressure washer, use it only to rinse: wide fan tip, a few feet back, and the spray aimed down.
Four mistakes that damage vinyl siding
1. Too much pressure or heat
Vinyl is a thermoplastic. It softens as it warms, and it expands and contracts with the seasons, which is why installers hang the panels loose on their nails. Hot-water pressure washing is normal on concrete and grease. On vinyl, heat plus force can bow or ripple a panel, and that warp does not relax back out.
2. The wrong cleaner
Undiluted bleach can dull the finish and lighten dark panels unevenly. Solvent cleaners and degreasers made for concrete or engines can soften and craze vinyl. Abrasive cleaners scratch it. And any cleaner left to dry on the wall leaves residue that streaks the next time it rains. Read the label for the surfaces a product is made for. A cleaner that removes a stain from concrete can still harm vinyl.
3. Spraying up, into vents, or toward openings
This is the mistake that costs the most. Each opening in the wall is sealed against rain falling down, not against water arriving at pressure:
- Soffit and gable vents admit air, so they admit water aimed at them.
- Dryer and bath vents have flaps that open from the wrong angle.
- Window and door heads have flashing made for water running down.
- Hose bibs, cable entries, and electrical boxes are sealed against rain only.
- The bottom starter strip lets an upward spray into the whole cavity at once.
Keep the water going down or across. If a spot cannot be cleaned that way, clean it by hand.
4. Ignoring the materials next to the siding
The wall is rarely all vinyl. Stone veneer, painted trim, aluminum soffit, brick, and composite shutters sit on the same wall, and each needs its own treatment. Runoff that is fine on vinyl can stain a bluestone step or burn new plantings.
Stains a wash will not remove
Some marks on vinyl are not dirt, and no cleaner removes them:
- Oxidation. Rub your hand on the wall. If it comes away chalky, the sun has broken down the top layer of the vinyl. A wash cleans it, but the wall stays flat in color. Spot scrubbing makes it blotchy.
- Artillery fungus. Hard black dots, like specks of tar, usually near hardwood mulch beds. They bond tightly and often do not come off fully.
- Rust streaks below fasteners or metal fixtures. These need a rust remover made for vinyl, not a siding cleaner.
- Paint overspray and caulk bleed. These need a solvent made for the job, tested on a hidden panel first.
- Heat marks. Melted or warped spots from a grill or reflected sun from a low-E window are damage, not stains.
When to hand the job to a house washing crew
A one-story wall of sound vinyl with light algae is a fair homeowner job if you follow the steps above. Hand it off when:
- The house is two stories, or the gables need a ladder. Ladder work with a sprayer is where homeowners get hurt.
- The vinyl is chalky and you want an even result, not a blotchy one.
- The wall mixes vinyl with stone, stucco, or painted trim.
- The stain is not clearly algae or dirt.
- An earlier cleaning left streaks or marks.
House washing from us is a soft wash: a cleaning solution at low pressure, dwell time, and a rinse aimed down the wall. Before the crew arrives, our checklist on preparing your yard for house washing covers what to move and what to cover. Text a photo of the house to (610) 665-3995. We reply within 24 hours.